Sunday, July 28, 2013

Butternut Squash Lasagna Roll-ups

Probably one of my favorite tastes is a nutty, orange squash recipe...something slightly sweet and savory, with an earthy goodness (lame descriptor, but it's so true!). Pumpkin and butternut squash are my faves. If my mother read this, she'd probably let out a big, exhausted sigh of disbelief and roll her eyes. She spent much of my childhood relentlessly trying to get me to eat squash. It didn't matter how creative the recipe, I was having no part of all that. Now, I can't get enough...funny how tastes change over time. Sorry, Mom!

But I digress...

I wanted a quick recipe to satisfy my sudden squash craving tonight, and was pleased to find something that didn't require me trying to get all crazy and make my own pasta/ravioli. The recipe: Butternut Squash Lasagna Roll-ups, courtesy of this blog.

The recipe seemed pretty straight forward and quick, and I only needed two ingredients from the store. I got home from the store, gathered up my ingredients and started reading, only to discover the recipe called for COOKED squash..uh oh.

Every recipe I could find urged the reader to roast the squash in the oven....I don't have time for all that if I have any desire to keep my husband from turning into Betty White. Since I didn't have any Snickers on hand (get it?), I started to scour the internet for a quick alternative. There were a few microwave options, however, our microwave blew up (true story) about a week ago and we haven't gotten our new one installed. Insert plan B: "Cant I Cook This Squash Like A Potato??"

I split in half, cored, and peeled the outside skin from the squash, and then cut each half into 4 or 5 long spears to help speed up the cooking process, and in they went into the boiling water. After 10 minutes, they were the perfect softness to mash for this recipe! 

And, without further delay:

Butternut Squash Lasagna Roll-ups
Yield: Make 9-12 Lasagna Roll-ups
Ingredients
  • 3 T. butter
  • 1/4 c. flour
  • 2 cups whole milk
  • dash nutmeg
  • salt to taste
  • 2 cups finely pureed cooked butternut squash, well salted
  • 9-12 lasagna noodles, cooked
  • 1/3 cup shredded Parmesan cheese
  • 1 cup shredded mozzarella cheese
Instructions
Preheat your oven to 375 degrees and butter a baking dish (pie plate, cake pan... doesn't matter).
In a medium sauce pan melt the butter over medium heat. When the butter is melted add the flour and stir to combine. Let the butter and flour cook for 30 seconds. Slowly whisk the milk into the butter and flour mixture. Add the dash of nutmeg and salt to taste (you'll need quiet a bit of salt, around 1/2 tsp). Whisking often, cook over medium heat until the mixture starts to bubble. Allow the mixture to cook for 2 additional minutes and remove from the heat. Add more salt to taste.
To assemble the lasagna roll-ups, lay out the cooked lasagna noodles on your counter top. Spread around 2 tablespoons of the squash puree over the top the entire length of the lasagna noodles. You make have a little left over, feel free to distribute the remaining puree over the noodles or enjoy for a little pre-dinner snack. Sprinkle the Parmesan cheese all over the squash puree.
Starting at one end of the noodle roll it up like a cinnamon roll or jelly roll. Place the rolled noodle in the greased baking dish with the end of the noodle on the bottom so they don't flap open. Repeat with remaining noodles.
Once all of the noodles are in the baking dish pour the white sauce you made on the stove evenly over the top of all the lasagna roll-ups. Sprinkle the dish evenly with mozzarella cheese and bake for 20-30 minutes until the cheese is melted and everything is hot and bubble. Allow the dish to rest for 5 minutes before serving hot.
Notes:
Salt is very important in this dish. The flavors are very mild and light, so under-salting will lend to a very bland dish. I use pink Himalayan salt, a genius discovery courtesy of my mom-in-law, which has a much stronger flavor, without that "salty" aftertaste. Try it. I highly recommend it. 

Table Runner

Community junk days have been good to me this year. Among my finds was this old white shutter that had me immediately thinking of this table runner idea on Pinterest:

http://www.ehow.com/clips/5166120/

Paired with some vintage graters I've been collecting, here is my take on the idea:


As a night-time bonus, I put tea lights under each grater!

Thursday, July 11, 2013

Green Thumb attempts

This year I really stepped up my landscaping game. By that, I mean I actually attempted to do more than just keep our pre-existing landscaping alive.

This year, I created 3 potted plant arrangements, and planted.a.tree.

Pot #1 appropriately set the theme:


Pot #2 for the front steps:


Pot #3 was an unexpected holder of overflow flowers. Since this picture was taken, these flowers have taken OVER this pot! They look so pretty!

Last, but CERTAINLY not least, Grandpa & Grandma H. gifted me with a cherry blossom tree for my birthday this year. What a creative and thoughtful gift! I saw this strain (?) of cherry blossom while in Chicago for work and posted it on my Facebook to see if anyone knew what it was. Fast forward a year later and it became my birthday present! I think Mr. A and I almost killed each other trying to plant the thing along the side of the house, both of us having NO idea what the heck we were doing and nervous that we'd kill the thing. 

We weren't even sure if we should expect leaves this year, but, about a month after we planted it, we walked outside one morning to notice this development:


And there you have it. Next year, Ill try to venture even further out of my plant killing box. :)

Friday, July 5, 2013

One of these things is not like the other...


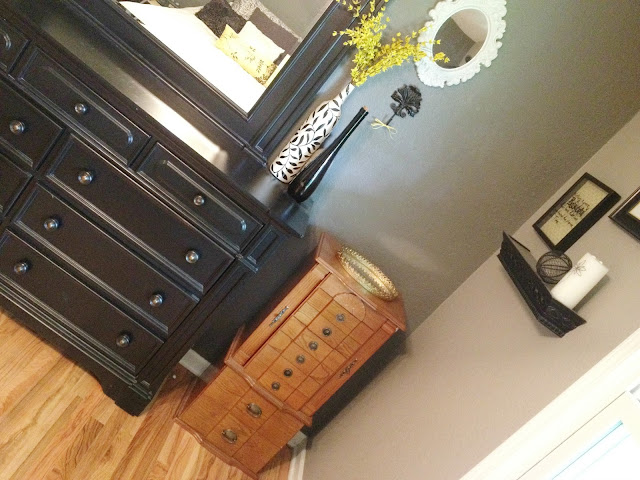
As we begin our spare bedroom-turned office transformation, my jewelry armoire (a 25.00 craigslist steal from a few years ago) needed to move into the master bedroom. The problem: 1990's honey oak. It hurts my eyes. I apologize to all of you natural wood lovers, there is just something about it that gives me the heebs....

Now, let me clear up any mis-conceptions--I may have a plethora of furniture painting tips on my pinterest boards, but that is by no means a reflection of the amount of furniture transforming I've done thus far. The thought of ACTUALLY refinishing furniture is a little intimidating. My goal was to re-create the smooth pottery-barn black of our dresser. The trick--THIS little magic roller. Made specifically for painting cabinetry, this roller creates a factory finish with very little effort. Without it, I don't think I would have stood a chance. The best part: it cost less than 3.00.


After taking out all of the little compartments, it made the perfect cubby for a little visitor:

I used Rust-oleum gray primer, which covered well and dried quickly. By the time I was done priming the whole thing, it was already fully dry and ready to paint.

From there, I color matched the black paint from our dresser in Behr brand paint, and got to work.


I decided to leave the pulls in their original state; they were a pretty close match to the pulls on our dresser, so I seized the opportunity to save myself some time and money. 


Tuesday, July 2, 2013

Washi Love

I finally jumped aboard the washi train. Washi tape has been making an appearance on my pinterest feed, craft sites, and blogs I follow as of late.  My inspiration?? This:

http://www.brit.co/washi-workspace/

I jumped at the opportunity to cover my laptop in colorful washi...it should really come as no surprise. I was the kid who ordered the 100 sticker packs from my Scholastic Book Orders, and upon their arrival, covered the side of my dresser with every last one. Unlike washi tape, those stickers were a little more resistant at coming off. So resistant in fact, that as I gathered and packed my things to head off to college, I gave a quick goodbye smile to my sticker-embellished dresser, a forever reminder of the decor commitment I had made 11 years earlier. 

Washi tape must have been made for me. It enables me to add a little unconventional fun to my space without the commitment and lifetime of adhesive that not even Goo Gone could touch.

Finding these for less than 2.00 a pop, it was a cheap weeknight project. I was surprised at how well an exacto knife worked at getting the tape to perfectly cover each key.

My take on the washi-covered keyboard:


Stay tuned for part 2, DIY laptop skin!